Sagging skin under the arms rarely responds to diet or exercise alone. If you have decided on an arm lift, the weeks before surgery shape how smooth your recovery feels and how clean your final result looks.
Most patients who walk into my follow-ups feeling relieved did the same things ahead of time: they sorted their medications, lined up help at home, and stopped guessing about what to wear afterward. Arm lift preparation is less about grand gestures and more about removing small obstacles before they turn into problems.
Think of it as clearing the runway. The checklist below covers the practical steps that genuinely make a difference, from the day you schedule surgery to the morning you head to the clinic.
Pre-Procedure Consultation and Health Review
Your surgeon will sit down with you before the procedure and walk through what an arm lift actually involves, from where the incision will sit to how much skin and fat they expect to remove. This is the moment to ask every question that has been sitting in the back of your mind, no matter how small it feels. Recovery timelines, scarring patterns, and what your arms will realistically look like once the swelling settles are all fair game, and a good surgeon will answer them honestly rather than glossing over the harder parts.
Equally important, the appointment doubles as a full health review. Expect questions about past surgeries, chronic conditions, allergies, and any family history of reactions to anesthesia. Bring a written list of every medication and supplement you take, including things that seem harmless like fish oil or herbal teas, because some of them quietly thin the blood or interfere with healing. Your surgeon may also order bloodwork or ask for clearance from your primary care doctor if you have heart, lung, or metabolic concerns. Honest answers here protect you on the operating table and shape how smoothly the first weeks of recovery unfold.
Finally, use this visit to align expectations with reality. Look at before-and-after photos of patients whose starting point resembles yours, and pay attention to body type, skin quality, and age rather than chasing an idealized image. A candid conversation about what the procedure can and cannot change helps you walk in with clear eyes and walk out with results that genuinely fit.
Medications and Habits to Pause Before Surgery
Before any incision is made, what you put into your body quietly shapes how the next few weeks unfold. Many patients focus on logistics like fasting or rides to the clinic and overlook the smaller daily routines that quietly influence bleeding risk, healing speed, and how comfortable the early recovery actually feels.
Your surgical team will give you a personalized list, but a few categories almost always appear because they are the most common culprits behind bruising, swelling, or unexpected reactions during and after surgery.
- Blood-thinning medications such as aspirin, ibuprofen, naproxen, and most prescription anti-inflammatories are typically paused for one to two weeks beforehand to reduce excessive bleeding.
- Herbal supplements including fish oil, ginkgo, ginseng, garlic extract, and vitamin E in high doses can also thin the blood and interfere with clotting, even though they feel harmless.
- Smoking and nicotine products constrict blood vessels and dramatically slow tissue repair, so surgeons usually ask patients to stop at least several weeks ahead and remain nicotine-free during healing.
- Alcohol consumption in the days leading up to the procedure can dehydrate the body, interact with anesthesia, and increase post-operative swelling.
- Recreational substances and unprescribed drugs should be disclosed openly so the anesthesiologist can plan safely, since隐瞒 details may create serious complications.
- Certain prescription drugs for diabetes, hormones, or blood pressure may need temporary dose adjustments, which only the operating surgeon should authorize.
Bring every bottle, packet, and prescription to the pre-op visit so nothing slips through the cracks. A quick photo of your medicine cabinet on your phone is often the simplest way to make sure nothing gets forgotten in the conversation.
Planning Your Recovery Space at Home

The first days after an arm lift matter as much as the hours spent in the operating room, and where you rest plays a surprisingly big role in how smoothly that window goes. Before surgery, walk through your home the way you will the night you return: arms tender, range of motion limited, and energy lower than you expect. A little setup now prevents a lot of frustration later.
Choose a recovery spot on the main living level if possible, so stairs are not part of the first 48 to 72 hours. A recliner or a bed with extra pillows to keep your upper body slightly elevated helps reduce swelling around the incision lines and lets you settle in without pressing your palms flat into the mattress. Keep the television remote, phone charger, water bottle, lip balm, prescribed medications, and a small notebook for symptom notes within arm’s reach so you never have to twist, bend, or stretch for them.
Lighting and noise deserve a quiet thought too. Soft, dimmable lamps are easier on sore eyes than harsh overhead fixtures, and a white noise machine or a familiar playlist can mask the household sounds that would otherwise pull you out of short naps. Place a small trash bin and a box of tissues beside the recovery chair, because drains, dressings, and small dressings changes are part of the early routine.
Ask a friend or family member to stay with you for at least the first night, and prepare simple, soft meals ahead of time. Soups, smoothies, and protein-rich snacks support healing without forcing you to stand at the stove. Loose, front-opening tops, slip-on shoes, and a clean, folded blanket within reach round out a recovery environment that lets you focus on rest instead of logistics.
Day-Before and Morning Preparation Steps
The evening before your arm lift, treat it like a quiet reset for both body and mind. Lay out loose, front-opening clothing, slip-on shoes, and the compression garment your surgeon recommended so nothing has to be hunted down at dawn. Confirm your ride, double-check arrival time, and charge your phone near the bed where you’ll rest after coming home. A light, early dinner helps, since fasting instructions usually mean no food or drink after midnight.
Morning arrives faster than expected, so keep the routine simple. Shower with the antibacterial soap your surgeon may have suggested, skip lotions, deodorant, perfumes, and makeup, and leave jewelry and contact lenses behind. Take only the medications your surgical team explicitly approved with a small sip of water, and brush your teeth without swallowing. Bring your ID, insurance card, a list of current prescriptions, and any paperwork you were asked to complete in advance.
Walking out the door feels easier when nothing at home still needs deciding. Take one last look at the recovery space you set up, make sure essentials are within arm’s reach, and remind yourself that each small task today is quietly shaping a smoother procedure and a calmer first night of healing.
What to Expect on the Day of Surgery

Walking into the surgical facility on the morning of your procedure can feel surreal after weeks of planning. Knowing the rhythm of the day in advance turns nervous energy into quiet focus, so nothing about the experience feels unexpected.
From arrival to discharge, every step has a purpose, and most of them move faster than patients imagine once the team takes over.
- Arrival and check-in: You will be greeted, asked to confirm identification, and walked through final paperwork before changing into a surgical gown in a private pre-op area.
- Pre-operative assessment: A nurse records baseline vital signs, reviews your last meals, and verifies that all pausing guidelines from your earlier prep have been followed.
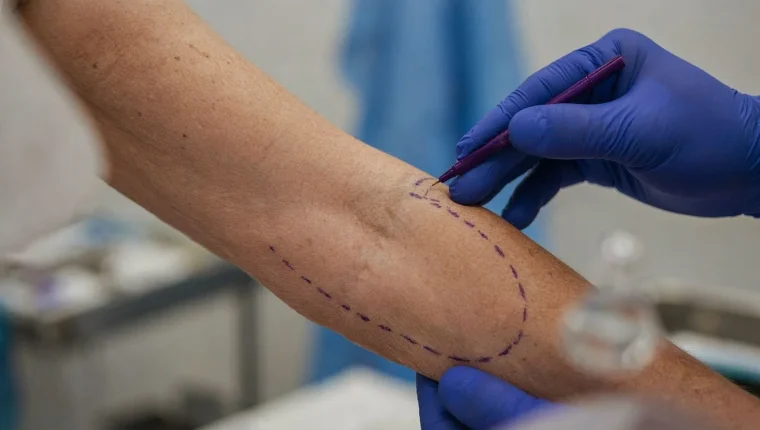
- Markings and photographs: Your surgeon uses a surgical marker to map incision lines along the arms while you stand, giving you a last chance to ask questions before anesthesia begins.
- Anesthesia and monitoring: Depending on the plan, you may receive general anesthesia or local anesthesia with sedation; an anesthesiologist stays at your side throughout to manage pain control and vital signs.
- The procedure itself: Incisions are placed along the inner or back of the arm, excess skin and fat are removed, and internal tissues are tightened before the skin is sutured and bandaged.
- Recovery room transition: You wake gradually while staff monitor your comfort, then receive written instructions covering drains, compression sleeves, and warning signs before a responsible adult drives you home.
Treat this outline as a mental rehearsal rather than a rigid script, because the surgical team tailors each step to your plan. Holding a clear picture of the morning helps you arrive composed and ready to begin recovery on solid footing.
Early Recovery Tips After Your Arm Lift
Once the anesthesia wears off and you’re back home, the first forty-eight hours set the tone for how smoothly the rest of your healing will unfold. Keep your arms elevated on a couple of firm pillows while you rest, and aim to take short, gentle walks around the house every couple of hours; the movement helps your circulation and lowers the risk of blood pooling near the incision lines. You’ll likely be wrapped in compression sleeves or bandages, and leaving those exactly as your surgical team placed them is one of the simplest ways to control swelling during this early stage.
Pain tends to peak in the first two or three days, so stay ahead of it by taking your prescribed medication on schedule rather than waiting until discomfort becomes sharp. Stick to soft, protein-rich meals and keep a water bottle within reach, since good nutrition and steady hydration quietly support tissue repair while your body does its hardest work. Avoid lifting anything heavier than a phone, skip reaching overhead, and let someone else handle household chores that involve pushing, pulling, or stretching the arms.
Most surgeons want to see you within the first week to check the dressings and monitor the incision sites, so keep that appointment on your calendar and jot down any sudden questions the moment they come to mind. Swelling, bruising, and a tight pulling sensation across the upper arms are normal during this window, but call your clinic right away if you notice rapidly increasing pain, unexpected drainage, fever, or pressure that does not ease when you elevate your arms. Treating these first days with patience and consistency gives the rest of your recovery a calm, predictable rhythm.
FAQs
What medical tests should I complete before scheduling my arm lift?
A few weeks before your arm lift, your surgeon will typically order a complete blood count, basic metabolic panel, coagulation profile, and an ECG if you're over a certain age or have relevant health history. They'll also review any medications and supplements you're taking, and may request imaging or additional clearance from your primary care physician if you have conditions like diabetes or heart disease. Completing these tests early gives your team time to address any concerns and keeps your surgery day on track.
Which medications and supplements need to be stopped prior to arm lift surgery?
You'll want to stop blood-thinning medications like aspirin, ibuprofen, naproxen, and any prescription anticoagulants about 1–2 weeks before surgery to reduce bleeding risk. Herbal supplements such as ginkgo, garlic, ginseng, fish oil, and vitamin E should also be paused during the same window since they can interfere with clotting and anesthesia. Always review your full medication and supplement list with your surgeon so they can give you a personalized timeline for stopping and restarting each one.
How should I prepare my home for a smooth recovery after arm lift?
Create a comfortable recovery area on your main floor with extra pillows to keep your arms elevated, loose button-up shirts, easy-to-reach essentials, and prescribed medications within arm's reach. Stock your fridge with prepared meals and hydration supplies in advance, since lifting and reaching will be limited for the first week or two. Arrange for someone to stay with you for at least the first 24 to 48 hours to help with daily tasks, and keep your surgeon's contact information handy along with a list of post-op instructions.